Welcome to curated list of handpicked free online resources related to IT, cloud, Big Data, programming languages, Devops. Fresh news and community maintained list of links updated daily. Like what you see? [ Join our newsletter ]

Get a LoadBalancer for your private Kubernetes cluster

Categories

Tags devops kubernetes containers microservices

In this tutorial, author will walk through how you can expose a Service of type LoadBalancer in Kubernetes, and then get a public, routeable IP for any service on your local or dev cluster through the new inlets-operator. By Alex Ellis.

The inlets-operator is a Kubernetes controller that automates a network tunnelling tool I released at the beginning of the year named inlets. Inlets can create a tunnel from a computer behind NAT/firewall/private networks to one on another network such as the internet. Think of it like “Ngrok, but Open Source and without limits”.

Alex Ellis

First we’ll create a local cluster using K3d or KinD, then create a Deployment for Nginx, expose it as a LoadBalancer, and then access it from the Internet.

The article walks you through:

  • Prerequisites
  • Option A – Install your local cluster with k3d
  • Option B – Install your local cluster with KinD
  • Create a Cloud Access Token
  • Deploy the inlets-operator into your cluster
  • Create a test deployment
  • Expose Nginx as a LoadBalancer
  • Access your local cluster service from the Internet
  • Management and the CRD

… and more. Plenty of screen shots and good explanation of all the commands you will use to run your cluster. There is also link to video demo. By using inlets and the new inlets-operator, we can now get a public IP for Kubernetes services behind NAT, firewalls, and private networks. Exciting!

[Read More]
How to design for panic resilience in Rust

Categories

Tags programming functional-programming learning performance

Don’t panic! Learn to build quality software resilient to errors. In this story, we discuss methods for panic resilience in Rust applications, to make quality software users can rely upon. By Luke I. Wilson.

If you consider your software a car driving at about 60 miles per hour, a panic is like hitting a brick wall.

Some newer languages designed after C use exceptions for error handling, which is a high-level abstraction to error codes. Calling a function which may fail and cause an exception requires a try and catch block – to execute code that may cause an exception, and to handle the error signaled by the exception. Exceptions are still not always explicitly handled, and thus some lazy programmers handle exceptions the same way as .unwrap() handles errors in Rust — print the error and fail.

A crash is not ever “appropriate” behavior, but it’s better than allowing your system to cause physical damage. If at any time it may be believed that the software could cause something deadly, expensive, or destructive to happen, it’s probably best to shut it down.

The article looks at three crucial sections about handling errors in Rust:

  • When to Panic,
  • Handling Errors,
  • And the additional section: Error Handling in a Library.

It is always better to exit with an error code than to panic. In the best situation, no software you write will ever panic. A panic is a controlled crash, and must be avoided to build reliable software. Rust empowers anyone to build highly robust, reliable, and efficient software. So don’t panic! Use the correct methods for writing reliable software with Rust. You will get links to further reading and example code to explain points mentioned in article. Well done!

[Read More]

How to deploy Deno applications to production

Categories

Tags javascript open-source nodejs devops

In this tutorial, you will be creating a simple Deno application to display hello world. Unlike NodeJS, you do not need to run npm init to create a new application. You can simply create a TypeScript file and start coding away. By Michael Okoh.

You will need Docker installed on your server and local machine, an Ubuntu server, you can get one from DigitalOcean, basic understanding of git, basic understanding of the command line interface.

The article covers the following topics:

  • Prerequisites
  • How to create a Docker configuration
  • How to build and run the container
  • How to deploy to production (using push to Github)

All the code is provided together with the commands to run on the remote server instance. Good read for anybody new to Docker, containers and app hosting!

[Read More]

How I created a coronavirus tracker app in just 3 days with Ionic and Firebase

Categories

Tags app-development react javascript open-source android ios

Kapil Raghuwanshi creted this tutorial for any fun of hybrid mobile apps. He is really fond of Hybrid App technologies – they help us achieve so much in a single codebase. Using the Ionic Framework, author developed a cross-platform mobile solution for tracking Coronavirus cases in just 3 days.

You are going to learn how to develop an Android, iOS, and Progressive Web App to track the cases around us with the latest related news, help, and feedback sections. Thus this tutorial is for everyone who has just a basic understanding of Web Fundamentals. So, let’s begin.

The author then describes everything in detail:

  • Idea, plan, and engineering
  • Technology stack
  • Tooling
  • Installation & scaffolding
  • Developing COVID19 dashboard and safety guidelines tabs
  • Developing country and news tabs
  • Developing the help tab and deployment

The article is very detailed and contains a ton of resources, detailed explanations of the code with multiple screen-grabs for all 3 targeted platforms (Progressive Web App (PWA), IoS and Android). Due to policy issues of the epidemic, Google Play Store, Amazon App Store, and others are not accepting app packages related to the Coronavirus. So until and unless you have authenticity proofs from any Government, Hospitals, or any designated Health Institution, no stores are accepting these apps. Still super useful and we recommend to bookmark the article for your future reference!

[Read More]

How to perform K-means clustering with Python in Scikit?

Categories

Tags python data-science analytics big-data

While deep learning algorithms belong to today’s fashionable class of machine learning algorithms, there exists more out there. Clustering is one type of machine learning where you do not feed the model a training set, but rather try to derive characteristics from the dataset at run-time in order to structure the dataset in a different way. It’s part of the class of unsupervised machine learning algorithms. By Christian Versloot.

k-means clustering is a method (…) that aims to partition n observations into k clusters in which each observation belongs to the cluster with the nearest mean (cluster centers or cluster centroid), serving as a prototype of the cluster.

Wikipedia

The article dives into:

  • What is K-means clustering?
  • Introducing K-means clustering
  • The K-means clustering algorithm
  • Inertia / Within-cluster sum-of-squares criterion
  • On convergence of K-means clustering
  • The drawbacks of K-means clustering – when is it a bad choice?
  • Implementing K-means clustering with Python and Scikit-learn
  • Generating convex and isotropic clusters
  • Applying the K-means clustering algorithm
  • Full model code
  • Results

In this blog post, we looked at K-means clustering with Python and Scikit-learn. You will also get good explanation of Python code, links to further reading and resources together with some video talks explaining the concepts and science behind the article. Nice one!

[Read More]

Functional error handling with Express.js and DDD | Enterprise Node.js + TypeScript

Categories

Tags nodejs javascript frontend web-development

How to expressively represent (database, validation and unexpected) errors as domain concepts using functional programming concepts and how to hook those errors up to our Express.js base controller. By Khalil Stemmler, a developer advocate at Apollo GraphQL.

In most programming projects, there’s confusion as to how and where errors should be handled. Do I throw an error and let the client figure out how to handle it? Do I return null?

When we throw errors, we disrupt the flow of the program and make it trickier for someone to walk through the code, since exceptions share similarities with the sometimes criticized GOTO command.

And when we return null, we’re breaking the design principle that “a method should return a single type”. Not adhering to this can lead to misuse of our methods from clients.

The article the deals with:

  • Why expressing errors explicitly is important to domain modeling
  • How to expressively represent errors using types
  • How to and why to organize all errors by Use Cases
  • How to elegantly connect errors to Express.js API responses

This is long article with detailed explanation of the code and design and you also get access to GitHub repository. Great read!

[Read More]

5 Useful jq commands to parse JSON on the CLI

Categories

Tags json big-data data-science programming software

JSON has become the de facto standard data representation for the web. It’s lightweight, human-readable (in theory) and supported by all major languages and platforms. However, working on the CLI with JSON is still hard using traditional CLI tooling. By Fabian Keller.

Lucky, there is jq, a command-line JSON processor. jq offers a broad range of operations to transform and manipulate JSON based data structures from the command line. Looking at the documentation however reveals an overwhelmingly huge number of options, functions and things you can do with jq. This blog post shows 5 useful jq commands that you really need to know.

The article then describes:

  • The GitHub events API as example
  • Exploring the data structure
    • Extract a specific element from an array
    • Extract a specific key for all elements
    • Filter by specific value
    • Extracting all JSON paths
    • Deep text search

This blog post has shown some basic and advanced jq commands to explore and thrive with JSON on the command line. jq is very powerful and a reliable companion as soon as there is the first bit of JSON data on the CLI. Exciting!

[Read More]

JAMstack step by step tutorial to create a website with just clicks and no code at all for free

Categories

Tags nodejs javascript web-development

This JAMstack tutorial will show you how to create a JAMstack website with just clicks, no code and for $0. It will detail how to set up a JAMstack website step by step with 30+ screenshots and 2000+ words. It will involve using a git-based CMS service to edit your content easily. Let’s get started. By Geshan Manandhar.

If JAMstack is something new for you have a look at my previous post detailing what is JAMstack and some of its technical aspects. For this tutorial following are the prerequisites:

  • You must have a working email address (a no brainier, still good to be explicit)
  • Knowledge of markdown would be beneficial
  • Knowledge of a static site generator like Hugo would help
  • Previous know-how of using any Content Management System (CMS) like Drupal or Wordpress would be great

You will need to register for the 4 (or less) online services to get your JAMstack website up and running. The good news is all of them have a free plan so your website will have a recurring running cost of exactly $0, hurray!

  • Github - To host the code, probably you already have a Github account :)
  • Netlify - CDN to host the website, it will be fast as it will be static files mainly
  • Forestry - Git-based Content Management System (CMS) service to edit the JAMStack website content, your content changes will reflect on the website in a couple of minutes. Still fast for a JAMstack website
  • Stackbit - Service to manage above 3 and glue all of them together to bring your JAMstack website to life

This is just scratching the surface, now you can show your running website to people but do remember to optimize it well before going live. Good read!

[Read More]

Serverless and Knative: Knative Serving

Categories

Tags kubernetes devops app-development software-architecture containers

In this article author will cover Knative Serving, which is responsible for deploying and running containers, also networking and auto-scaling. Auto-scaling allows scale to zero and is probably the main reason why Knative is referred to as Serverless platform. By haralduebele.

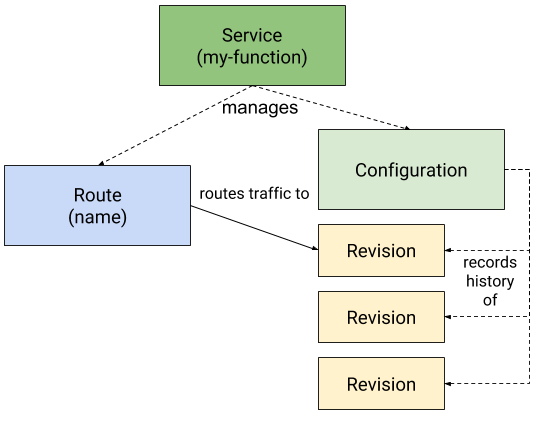
Knative uses new terminology for its resources. They are:

  • Service: Responsible for managing the life cycle of an application/workload. Creates and owns the other Knative objects Route and Configuration.
  • Route: Maps a network endpoint to one or multiple Revisions. Allows Traffic Management.
  • Configuration: Desired state of the workload. Creates and maintains Revisions.
  • Revision: Specific version of a code deployment. Revisions are immutable. Revisions can be scaled up and down. Rules can be applied to the Route to direct traffic to specific Revisions.

Knative terminology and resources

Source: https://knative.dev/

Knative workloads: In contrast to general-purpose containers(Kubernetes), stateless request-triggered (i.e. on-demand) autoscaled containers have the following properties:

  • Little or no long-term runtime state (especially in cases where code might be scaled to zero in the absence of request traffic)
  • Logging and monitoring aggregation (telemetry) is important for understanding and debugging the system, as containers might be created or deleted at any time in response to autoscaling
  • Multitenancy is highly desirable to allow cost sharing for bursty applications on relatively stable underlying hardware resources

To lern more read the article in full. You will also get access to code repository with example code. Excellent for anybody migrating from Kubernetes to Knative.

[Read More]

Build your first data warehouse with Airflow on GCP

Categories

Tags google cloud gcp big-data cio data-science

What are the steps in building a data warehouse? What cloud technology should you use? How to use Airflow to orchestrate your pipeline? By Tuan Nguyen.

In this project, we will build a data warehouse on Google Cloud Platform that will help answer common business questions as well as powering dashboards. You will experience first hand how to build a DAG to achieve a common data engineering task: extract data from sources, load to a data sink, transform and model the data for business consumption.

The article is split into:

  • Why Google Cloud Platform?
    • Cost
    • Ease of use
  • Business objective
  • The dataset
  • Data modeling
  • Architecture
  • Set up the infrastructure
  • Data pipeline

… and much more. Author will walk through the many steps of designing and deploying a data warehouse in GCP using Airflow as an orchestrator. You will also get source code which you can reference in GitHub repo.Excellent for anybody in data science!

[Read More]